Samsung SM-A145F BIT U1 to U9 FRP Removed File And Method

Security Status: SAFE
Scanned by 65+ antivirus engines • No threats detected
Screenshots & Preview
Click on images to view full size (1 images)
Professional FRP removal guide for Samsung SM-A145F. Access tested flash files for BIT U1 to U9 and master Odin tool flashing. Remove Google lock permanently with our tutorial and support.
Samsung Galaxy SM-A145F FRP Bypass Solution
The Samsung Galaxy SM-A145F FRP lock can be challenging to bypass, especially with newer security patches. This guide provides tested flash files compatible with BIT levels U1 through U9, ensuring successful FRP removal regardless of your device’s security level.
Understanding BIT Security Levels
Samsung Binary (BIT) levels as security measures. Each update increases the BIT counter, preventing downgrade attacks. Our SM-A145F FRP files support all current BIT levels from U1 to U9, ensuring compatibility with your device’s security patch.
Prerequisites for FRP Bypass
Required Tools and Files
- Samsung Odin v3.14.4 or latest version
- SM-A145F FRP bypass file (matching your BIT level)
- Samsung USB drivers installed
- USB cable (original recommended)
- Windows PC (7/8/10/11 compatible)
Device Preparation Steps
Before initiating the FRP bypass process, ensure your Samsung Galaxy SM-A145F battery is charged above 60%. This prevents interruption during the critical flashing procedure that could potentially brick your device.
Step-by-Step Flashing Instructions
Entering Download Mode
- Power off your SM-A145F completely
- Press and hold Volume Up + Volume Down buttons simultaneously
- Connect USB cable while holding buttons
- Release when Download Mode warning appears
- Press Volume Up to confirm entry
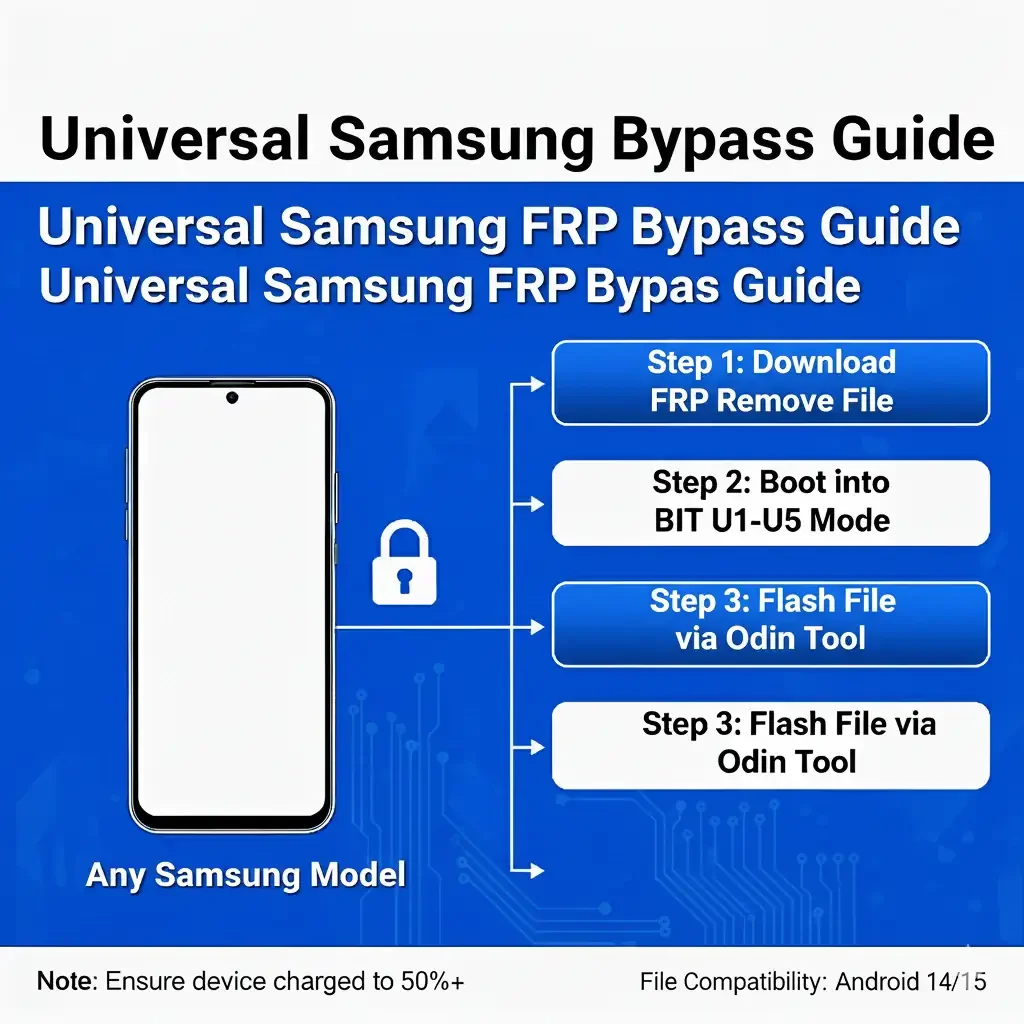
Odin Configuration Settings
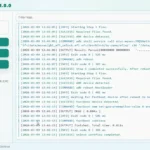
Launch Samsung Odin with administrator privileges. The tool should detect your device displaying “Added!” message in the log window. Configure these essential settings for successful FRP bypass:
- Auto Reboot: Checked
- F. Reset Time: Checked
- Re-Partition: Unchecked (Important)
- Nand Erase: Unchecked
Loading FRP Files
Click the AP button in Odin and select your SM-A145F FRP bypass file. The file selection depends on your device’s current BIT level. Check your BIT level in Download Mode screen (Binary: U1/U2/U3/U4/U5/U6/U7/U8/U9).
Flashing Process Execution
After loading the appropriate file, click “Start” button. The flashing process typically takes 3-5 minutes. Monitor the progress bar and wait for “PASS!” message in green. Your device will automatically reboot upon successful completion.
Post-Flash Configuration
Once your Samsung Galaxy SM-A145F restarts, the FRP lock should be bypassed. Complete the initial setup wizard without Google account verification. Remember to enable Developer Options and OEM Unlocking to prevent future FRP locks.
Troubleshooting Common Issues
Device Not Detected in Odin
- Reinstall Samsung USB drivers
- Try different USB ports (USB 2.0 recommended)
- Replace USB cable with original Samsung cable
- Disable Windows Defender temporarily
Flash Failed Error Messages
If Odin displays “FAIL” message, verify you’re using the correct BIT level file. Mismatched BIT versions are the primary cause of flash failures. Download the exact version matching your device’s binary level.
Important Safety Considerations
FRP bypass should only be performed on devices you legally own. This process voids warranty and may violate terms of service. Always backup important data before attempting any flash procedure. Samsung implements FRP for device security – bypassing it reduces theft protection.
Legal Disclaimer
This tutorial provides educational information for legitimate device recovery. Users assume all risks associated with modifying device firmware. We recommend professional service center assistance for warranty-covered devices.
Conclusion
Successfully bypassing FRP on Samsung Galaxy SM-A145F requires proper tools, correct files, and careful execution. This guide covers all BIT levels from U1 to U9, ensuring compatibility with various security patches. Follow each step precisely for optimal results and always prioritize device safety during the flashing process.
Easy Installation
Simple setup process with clear instructions
Safe & Secure
Scanned and verified free from malware
Fast Download
Multiple mirror servers for fastest download speeds
Minimum Requirements
Recommended
- Latest version with all current features
- Bug fixes and performance improvements
- Security updates and patches
- Compatibility improvements
Rate & Review This Software
User Reviews
No reviews yet. Be the first to review!
About the Author / Developer